Tuesday 29 November 2011

Snowdrops


I thought you might like to see another winter card. This card uses another element from this set;
FRCL101 A Winter's Day. 

It's like a tiny scene from the garden. There is also something magical about Snowdrops in the snow. This card was part of a group of cards I made to show how to use all the elements in this set. I posted another card just a couple of days ago using the 'Robin on the watering can' element.


I used 'Inktense' pencils for the colouring. As the name suggest you achieve deeper stronger colours then with normal watercolour pencils. I do enjoy working with them. You can purchase them in sets or individually.

Saturday 26 November 2011

Another Robin


This little robin come from this set;
FRCL101 A Winter's Day

I used the wordings from this set for my large Robin card on the previous post. I love the font. I wish my handwriting was as good as that!

This is another lovely traditional set. The images in the set are considerably smaller and would be good to practice colouring. 

You can actually use this element and the single robin and snowdrop in the set to create a larger scene.

I should have straightened the ribbon before taking the picture!

Friday 25 November 2011

Woodware Design Team Challenge - Pick one colour and go with it


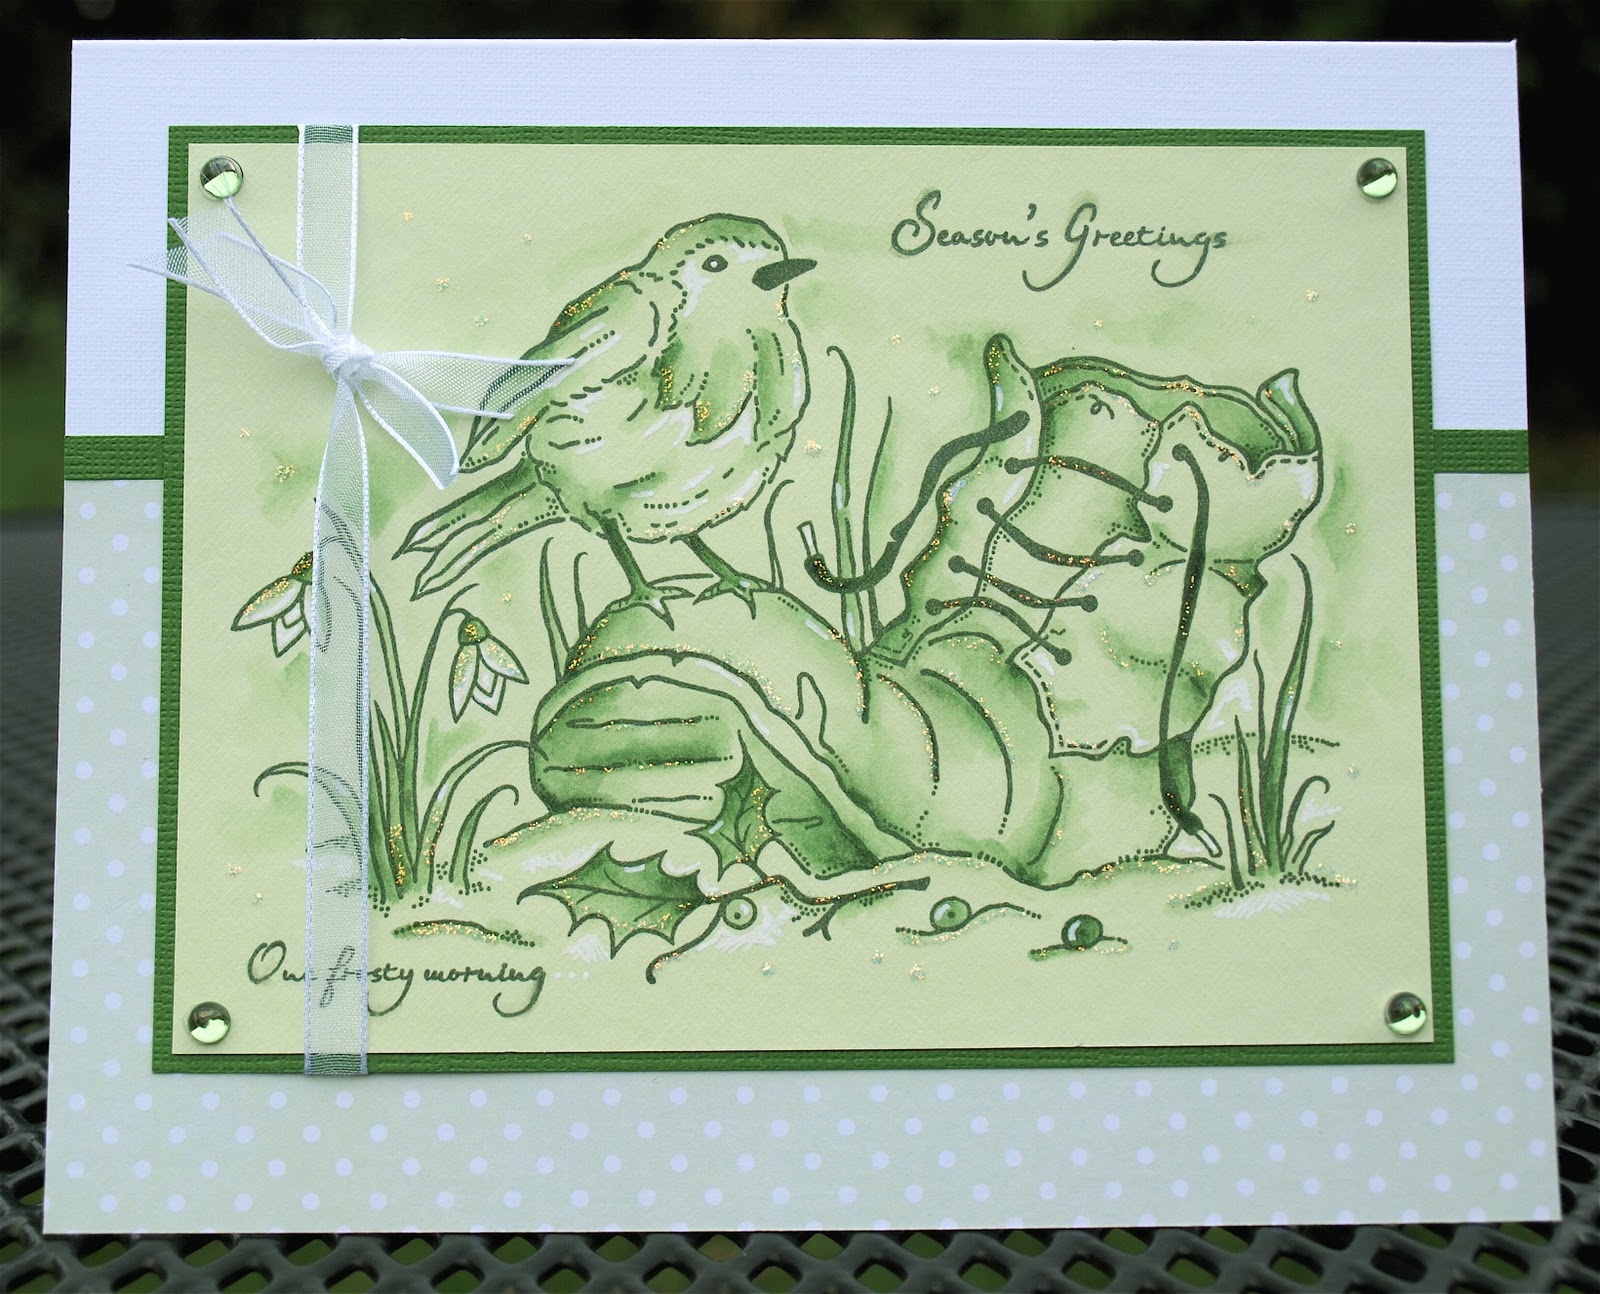
I decided to go for green which I thought no one else would choose but I was beaten to it! I've used my 'Robin on a boot' stamp which is one of my favourites from this Christmas release. It involved quite a bit of colouring but makes a substantial card.
The code for the stamp is;
I've stamped using the 'Pearlescent Ivy' Brilliance ink pad. It's a muted green as the ivy in the name implies. I chose pale green card for my base.What a difference this makes from stamping on white card with black ink!

To add the shading you could use ink from the pad and dilute it with water. Instead I used one of the Sakura Dark Stardust pens '734 Dark Jade Star'. It is a perfect match for the ink. You cannot tell from my picture but it leaves a shimmery effect as you paint. It also spreads more easily than the ink from the pad.I have added white highlights with a Sakura White Gelly roll pen.

For finishing touches I've used some 'Diamond' Stickles, ribbon and Mark Richards pale green dots.
The greetings come from another Robin set;
FRCL101 A winter's Day

Don't forget that you could use this stamp for a gardening greeting card. After all they do call the Robin the gardener's friend!

Pop along to the Woodware Blog to see other versions of the challenge by the design team.

Wednesday 23 November 2011

Wine Buff- Three for the men!


This is the second card from the Workshop I mentioned in the previous post. This card is actually a money /voucher wallet. So you could give a voucher for some special wines inside the card to make it that bit more special! When I cut the card I left an extra piece on the back panel to create flap which I folded to make a pocket inside the card.

After square cards I do like tall skinny cards. It's quite a different shape to play with in reference to the layout.
You could also use this card for someone retiring or if someone you know is moving to France. 
The stamps used come from set FRCL107 Wine Buff
Go back to Wine Buff post one to read more detail on the colouring.

Tuesday 22 November 2011

Wine Buff- Two for the men!


To continue with the theme of 'Wine Buff'. This is a card I made for a workshop at Dawn Bibby's establishment. It showcases a very different colour scheme using the FRCL130 Wine Buff set.
As with the card in the previous post I have started with a pale blue base card for my stamping. I've stuck to lime green and blues for my colour scheme. So basically I've kept to the colours in the background paper for colouring in. I like the fresh, crisp look of the card. A little raffia instead of ribbon is a bit more manly!

Monday 21 November 2011

Wine Buff- One for the men!

As I was digging into one of my many sample boxes looking for spare samples for a new retailer I came across this card which I created for one of the Woodware supplements. 
I thought I would showcase it as not everyone sees the supplements and we all struggle for ideas for mens cards. 
I've used set FRCL130 Wine Buff to create the card.
As well as the three main images you have a border stamp with names of different wines and other wine related elements such as the cheese and corkscrew in the set
I don't always work on a white base card for my stamping. It's quite nice to use a base card that relates to your colour scheme which in this case is pale lilac. This means your background is instantly coloured in. I've combined it with a teal green, burgundy or claret red and brown. For the colouring in I've used 'Inktense' watercolour pencils and a white gel pen for highlights.

Saturday 19 November 2011

woodware Design Team Challenge - Traditional Christmas

Traditional Christmas to me means red, green and images that remind us of why we celebrate the season. So I went for greenery, candle and doves. The set I have used is a couple years old but still lovely to use.
I have use Tombow pens for the colouring but not directly to paper. I have scribble a little on a tile and picked up the colour with a wet brush. With this method your colours will always be more intense than if you use watercolour pencils or paints.
I've added a hint of glitter and Mark Richards gems to the corners.
The background is made up of strips of torn red card and a beautiful Magenta vellum. The thin red strip and the panel have secured the vellum to the card.


Why not pop over to the Woodware Blog to see other ideas from the design team

Thursday 10 November 2011

Tin too!

As promised yesterday another tin! This time I have used my 'Patchwork dove' [FRS107]. I love this stamp... keep coming back to use it over and over.


I think it would be a really nice idea to enclose a CD with a collection of photos for 2011 or a collection of Christmas photos. If you do not scrap very often [Like me] it would be a simpler option! You could add 2011 to the tin using stamps or die cuts.


Something to think about... 
If you didn't see the other tin pop back to yesterday's post.

Wednesday 9 November 2011

Craftbarn Demo

A quick thank you to those who came to say hello at The Craftbarn Mini Fest on Sat 5th November. I had a really nice day. 


The theme was for gifts so for the occasion I had decorated some round tins using papers from the 'My Minds Eye Range' - one of the 6 by 6 paper pads. I did my paper piecing... you know how much I love this technique! I used one of my sets from the 'Patch a' range. In this case 'Patch a Bauble'
FRCL209 Patch a Bauble.
Another tin tomorrow...

Tuesday 8 November 2011

Robins and a bird cage!

I was asked about using my birdcage and birds stamps for a Christmas card by Christina at 'A Maze of Memories' and this is what I came up with.
I use this set to stamp a background on craft card with a VersaMark ink pad:
FRCL174 Holly Swirls
The greeting is from this set:
FRCL207 Ribbon Banners
The birdcage and birds stamps:
FRS205 Ornate Birdcage
FRS206 Birds


The heart brooch is made from a large metal brad and some Mark Richards gems and metals. It's inspired by a good friend and co-designer for Woodware Jane Gill.

Monday 7 November 2011

Woodware Design Team Challenge - Sketch

 Another sketch this week and I am first to showcase my version. I have not done Peel Off's for a while so I thought I would use some of my mushrooms:
93198B Mushrooms and Toadstools
If you look at the sketch layout over on the Woodware blog you will notice that instead of putting lots of layers in my matting I have chosen a wavy strip of craft card for the middle of the card and use faux stitching to make it stand out. 
The greeting comes from this set;
FRCL207 Ribbon Banners


A close up to show you my colouring. I used Copic markers and I have glazed over the colouring with my trusted Sakura Gelly Roll clear glaze pen. The glaze really brings out the colours of the Copic pens. This also shows how you can use your Copics pens with Peel Off's but they do need to be black ones.


I like to do a halo effect for the sky. I basically left a gap between the sky and the mushrooms. If you go right up and leave no gap you will probably end up having to fill the whole space to make it look right. It takes a bit of practice but is well worth learning.


The background paper is from the Oslo range of Woodware papers. One of my favourites!
Check out Woodware blog during this week to see other designs using this sketch.

Tuesday 1 November 2011

Woodware Challenge - One Layer

This is by far the quickest card I have made this year!... just one layer of stamping and a few additions with a Sakura Gelly Roll white pen and 0.1 Micron black pen.
The butterfly come from this set:
FRCL155 Flutterby Butterflies
And the greeting is from this set:
FRCL200 All Occasion Bloom
I use a 'Blue Breeze' KaleidaColor ink pad  for the butterflies to get some colour variation. The antennae are easy to draw as you are going over the blue ones already there.
A little tip for getting the butterflies in formation in the middle of the card. Use a card slightly larger than you intend to end with. Start by stamping the butterfly in the top left corner. After stamping all the butterflies you can trim the left and bottom borders to match.


I would probably add some white ribbon. You know me a card is not complete without a bit of ribbon! I wasn't sure if it would be counted as another layer...


Pop along to the Woodware blog to see other variations on this challenge.
Related Posts Plugin for WordPress, Blogger...